Wednesday

Tomato and Pesto Chicken

This is a great recipe, really tasty as well as being quick and easy.  It's fantastic with freshly made pesto if you have basil and the inclination but can easily be made with bought fresh pesto or even pesto from a jar (although the finished result doesn't quite have the same zingy, green freshness).  This serves 4 people.


It has been pointed out to me that the picture of this is not great...I admit I am struggling a tad with photographing savouries!  I assure you that in real life this dish looks and smells fabulous, but most importantly I believe, it tastes fantastic.  Please don't be put off by my lack of food photography skill....


Ingredients
4 Large Skinless Chicken Breasts
1 Carton (500g) Passata
1 Onion
2 Red Peppers, sliced into strips (I prefer to skin them first but it's not essential)
Olive Oil 
Approx. 5 tablespoons of Fresh Pesto (or 2-3 if from a jar)
Salt, Pepper and Sugar to season

  • Preheat the oven to 200C (fan)
  • Thinly slice the onion and tip into a large pan with a good glug of olive oil.  Sizzle slowly for 10 minutes until soft then add the red pepper, cook slowly for another 5 minutes then pour in the passata.  Season generously with salt, pepper and a teaspoon of sugar and let it simmer for about 15 minutes.
  • Heat some olive oil in a large frying pan and sear the chicken breasts until lightly golden brown all over then transfer to an oven proof dish.  Pour over the sauce and cook in the hot oven for 20 minutes.
  • After 20 mins take the dish out of the oven and spoon in the pesto, giving it a swirl round with a spoon then put back in the oven for a further 5 minutes until bubbling and fragrant.
  • Serve with pasta, sauteed potatoes or just some steamed green veg....delish!

Tuesday

Banana Spelt Mini Muffins

Spelt flour is great to bake with, the finished product always seems really light and fluffy, be it bread or cake.  People who suffer from a wheat intolerance often find they can eat spelt, but bear in mind that it is not suitable for coeliacs as it does contain gluten.
This recipe is a great way of using up old brown bananas!


Ingredients
2 Ripe Bananas
100g Sultanas
Enough Apple Juice to cover the sultanas in a small bowl
2 Large Eggs
Half a tspn Vanilla Extract
100ml Sunflower Oil
50g Caster Sugar
200g White Spelt Flour (I use Doves Farm Organic)
2 tspn Baking Powder (if you want wheat free, again Doves Farm is good)

  • Preheat the oven to 175C (fan) and put 12 fairy cake cases into a cupcake baking tin.  This recipe should make exactly 12 mini muffins.
  • Put the sultanas into a small plastic bowl and cover with apple juice (or water).  Heat in the microwave for about a minute and leave to soak.
  • In a large bowl, mash the bananas until smooth then add the eggs, oil, sugar and vanilla extract and whisk or beat together.
  • Sieve the flour and baking powder into the mixture and mix lightly just to combine.  Drain the sultanas and sprinkle with a small amount of spelt flour then mix lightly into the muffin mixture.
  • Spoon a generous amount into each fairy cake case leaving a bit of room at the top.
  • Bake them in the preheated oven for 15 minutes until a skewer inserted into a muffin comes out clean.
  • Eat as soon as they are cool enough, they are best eaten on the day they are made.

Nutella Choc Chip Cookies

Perhaps unsurprisingly, putting Nutella in a cookie recipe works a treat....yum!


Ingredients
100g Soft Butter (I always use spreadable)
100g Light Brown Muscovado Sugar
50g Caster Sugar
100g (about 4 tbsp) Nutella
1 Large Egg
175g Self-Raising Flour (you may need a bit more if your egg is very big)
300g Chocolate, chopped (I used all milk but you could do a mixture)

  • Preheat the oven to 175C (fan) and line a large baking tray with baking paper.
  • With a wooden spoon, cream together the butter and the sugar, then add the nutella and the egg and beat.  Mix in all the flour until you have a stiff dough, if it's more like a cake mixture add some more flour.
  • Tip all of the chopped chocolate into the bowl and stir to mix thoroughly.
  • Spoon balls of dough onto the lined baking sheet, I normally do these in two batches (should make about 24 cookies in total).
  • Bake in the preheated oven for 12 minutes until puffed and slightly firming around the edges.
  • Leave for a few minutes then transfer carefully to a plate or rack to cool.

Thursday

Great Grandma's Chocolate Topped Vanilla Cake

My mum has lots of memories of her gran's Chocolate Vanilla Cake and has been trying to recreate it from memory for some time.  Luckily we recently discovered that my uncle had the handwritten recipe lurking amongst old letters and books. 

It's fair to say that this cake is pretty much the same as a Boston Cream Pie.  My great grandmother worked as a professional cook during her life so it is possible that she found this recipe in a magazine or possibly an American cookbook, we will never know.  What is certain though is that it is a lighter version, with the filling not being as rich as a creme patissiere and the amount of butter in the sponge being less than normal.  Bearing in mind that she lived through both world wars, during the latter part of her life her shopping would have been restricted by rationing, so this probably affected several of her recipes.  

I have updated the ganache topping slightly but other than that the recipe is how she wrote it and I have to say it is a fabulous cake!  Incidentally, the fluted edge of the cake below comes from using a cake tin liner (from Lakeland Ltd) in the tin....so much easier than cutting out! 


Ingredients
125g Soft Butter
175g Caster Sugar (use vanilla sugar if you have it)
200g Plain Flour 
 2 tspn Baking Powder
Half a tspn Bicarbonate of Soda
3 Large Eggs
2 tbsp Milk
1 tspn Vanilla Extract

For the custard filling
Half a pint of Whole Milk
1 tbsp Cornflour
1 tbsp Caster Sugar (again, vanilla sugar if you have it)
1 Large Egg
1 tspn Vanilla Extract

For the chocolate ganache icing
100g Dark Chocolate (at least 70% cocoa solids), chopped into small pieces
100ml Single Cream (you can use double but single sets to a softer icing)
Approx 1 tbsp Butter
Enough icing sugar to thicken slightly

  • Preheat the oven to 175C or gas 4.  Grease and line a 20cm/8 inch springform cake tin (or use a cake tin liner!).  You could use two sandwich tins and reduce the baking time.
  • Using an electric whisk or mixer, cream together the butter and sugar until pale and fluffy. Add the flour, baking powder and bicarb with the eggs, milk and vanilla and whisk on slow at first to combine then high for a minute until the mixture is light and airy.  (Tip - check the mixture around the edges, if there are any signs of the mixture splitting slightly then whisk in a tablespoon or so more flour)
  • Spoon the mixture into the prepared tin and bake in the preheated oven for 40-50 minutes, use a skewer to insert into the cake to check it is cooked through.  Take it out of the tin after 5-10 minutes cooling then put on a rack to cool completely.
  • To make the vanilla custard, whisk all the ingredients together in a small pan and put on a low heat.  With a wooden spoon, stir constantly until it starts to thicken...at this point it may look like it's going lumpy, don't panic!  Stir frantically until it goes through the lumpy phase and thickens properly, it should be thick but not like a paste.  Pour this into a bowl and cover with cling film, gently pushing it onto the surface of the custard to prevent it forming a skin.  Leave to cool almost completely.
  • When the vanilla custard is cool take off the cling film, it will have thickened up considerably.  Take your cooled cake and cut it in half, put the bottom half on a plate and spoon on the vanilla custard, almost to the edges.  Carefully place the other half of the cake on the top....it will have a bit of a wobble. 
  • Make the chocolate ganache topping, measure the cream in a measuring jug then tip in the chopped chocolate.  I then heat this in the microwave in 20 second bursts until all the chocolate is melted (it shouldn't take more than 1 minute in total).  Stir to combine into a shiny, melted mass then add the butter and stir to melt in.  Sieve and stir in enough icing sugar to thicken and sweeten it slightly then pop in the fridge for 10 minutes to firm it up.
  • Slowly and carefully spoon the ganache on top of the cake so it is almost going over the sides then leave to set for an hour or two. 

Wednesday

Spinach and Ricotta Stuffed Pancakes with Sweet Tomato Sauce

The spinach and ricotta combination is a classic filling for pancakes or cannelloni and other pastas.  It's one of my ultimate comfort foods but can often be a bit bland, this one isn't!
Adding the sundried tomatoes is not essential but they do give the sauce so much depth, sweetness and richness that it's well worth a try (as a short cut you can use a few tablespoons of sundried tomato paste).


Makes 4 generously stuffed pancakes although the filling could probably be stretched to fill 6

Ingredients
4 Pancakes (Leftover from a pancake making session or bought!)
1 x 200g Bag of Baby Spinach Leaves
1 x 250g Tub of Ricotta
2 Cloves of Garlic, minced
Butter
Juice of half a lemon
Salt and Black Pepper
For the sweet tomato sauce:
Olive Oil
1 Red Onion
1 Clove of Garlic, chopped
Approx. 10 pieces of Sundried Tomatoes in Oil, chopped
1 x 400g tin of Plum Tomatoes
Half Tspn Sugar
1 tsp Balsamic Vinegar
Salt and Black Pepper
Favourite cheese for sprinkling on top - Mature Cheddar or Parmesan are good

  • To make the filling, melt a good sized knob of butter in a large pan or frying pan and add the minced garlic.  Sizzle slowly for 20 seconds then add the lemon juice and season generously with salt and pepper.  Tip in all the spinach and toss it around to cover thoroughly with the lemony garlic butter, then cook for a minute or two until the leaves are totally wilted.  Turn off the heat.
  • Using a large, slotted spoon, squeeze the spinach against one side of the pan, tipping it so most of the liquid comes out then lift the spinach into a bowl.  Leave to cool for a few minutes.
  • Spoon the ricotta into the spinach bowl and mix the two together with a fork.  Check the seasoning and set aside.
  • To make the tomato sauce, put a glug of olive oil into a frying pan on a medium heat, add the red onion and garlic and sizzle for a minute until softening.
  • Add the chopped sundried tomatoes along with about a tablespoon of the oil from the jar then tip in the tinned tomatoes.  Break up the tomatoes with a fork then add the sugar, balsamic vinegar and a sprinkling of salt and pepper, let the sauce simmer for about 10-15 minutes.
  • By this time the sauce should be reduced and sweet.  You can either use it as it is or liquidise it (I normally do this with a hand blender).
  • To assemble the dish, spoon a generous amount of the filling in a line down the middle of each pancake and roll up, lay the stuffed pancakes next to each other in a oven-proof dish.  Spoon over the sauce, leaving the ends of the pancakes sticking out then top with the grated cheese of your choice.
  • Bake at 200C for about 25 minutes until the cheese is bubbling and golden brown.  These are fab served with a leafy salad in a light lemony dressing!


Tuesday

Crunchy Salmon Nuggets

I firmly believe that children will eat most things that are breadcrumbed and fried, although I am yet to test that belief to any extreme!  I probably make either chicken or fish nuggets about once a week and like to involve my 4 year old in the making of them, I think he likes the process of dipping in one bowl then another.  Admittedly this process takes a bit of time so if I'm feeling particularly efficient I'll make a batch and freeze them in children's meal-sized portions.
For the breadcrumbs, I sometimes use bought Panko-style Japanese ones or I make my own very easily in a mini-chopper from slightly stale bread (I've made them by grating the bread on a box grater in the past too).
It's not really a recipe, it's more a process that can be used for many foods once you get into breadcrumbing!  I do recommend trying salmon though....


Ingredients
Salmon (or anything you think would benefit from being breadcrumbed)
A bowl of plain flour
A bowl with a beaten egg lightened with a splash of milk
A bowl of breadcrumbs (see above)
Oil for frying

  • Cut the salmon (or alternative) into bite-size pieces.
  • Dip each piece into the flour (shake to remove any excess), then the egg, then the breadcrumbs, pressing and turning for maximum coverage.  You can use your fingers for this but you will end up with thickly breadcrumbed fingersI use tongs for the flour bowl (to shake effectively) then a fork for the egg bowl and another fork for the breadcrumb bowl. 
  • You can then either fry them in enough oil to cover the bottom of a frying pan or bake them on an oiled baking tray in a hot oven.  The frying takes 3-4 minutes each side on a medium heat until golden brown or they bake in 10-15 minutes turning halfway through.
  • It's also worth mentioning that these are delicious for adults too...maybe add a touch of salt and pepper to the flour then serve with sweet chilli sauce or mayonnaise for dipping...yum!

Sunday

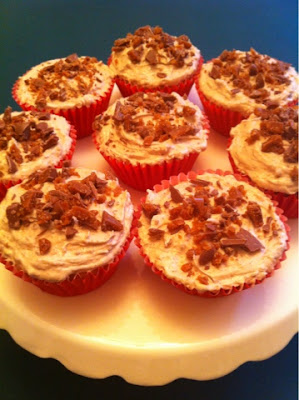
Brown Sugar Cupcakes with Daim Buttercream

We have decamped to the North this week to stay with my parents and I wanted to bake something to tempt my slim, health-conscious mum into eating cake.  She's always had a weakness for Daims and I have been trying for some time to think of an icing to go with my brown sugar cupcakes....ping, light bulb!
Vanilla sponge cupcakes made with light brown muscovado sugar instead of the usual white have a lovely subtle toffee flavour which goes very well with the butterscotch chocolateyness (possibly not a word) of the Daim Bar.  Having said that, these are made using the mini Daims....same thing only smaller and higher chocolate to crunchy butterscotch ratio!


Ingredients
125g Soft Butter (spreadable is easier)
125g Light Muscovado Sugar
150g Self-Raising Flour
2 Large Eggs
1 tspn Vanilla Extract
1 tspn Baking Powder
1 tbsp Milk

For the icing -
50g Soft Butter
100g Icing Sugar (Golden if you have it)
1-2 tbsp Milk
140g bag of Mini Daims

  • Preheat the oven to 175C (fan)
  • In a mixing bowl, cream together the butter and sugar until light and fluffy.  Add the eggs, flour, vanilla extract, milk and baking powder and give it all a good whisk until pale golden and smooth.  (Tip - if the mixture looks to be separating slightly around the edges whisk in a little more flour, it depends on the size of your eggs)
  • Spoon the mixture into cupcake cases (it should make 14 cupcakes, more if using smaller fairy cake cases).
  • Bake in the pre-heated oven for 12 (ish) minutes until firm to the touch and risen.  Put on a rack or plate to cool totally.
  • Unwrap all of the mini Daims and chop half of them up into small chunks for sprinkling.  The other half need to be smashed up, either in a mini-chopper or put in a double food bag and bash up with a rolling pin.
  • In a small mixing bowl, whisk the butter, milk and icing sugar together until pale and creamy then add the smashed up Daims and whisk some more.  Taste and, if the icing seems at all greasy, whisk in some more icing sugar until fluffy.
  • Generously smother the cool cupcakes with the icing and sprinkle with the crunchy pieces of Daim.
  • Display them on a plate or cake stand and admire for a few minutes...then eat and say 'Mmmmm' whilst nodding approvingly.

Saturday

Creamy Penne Pasta with Taleggio, Tomatoes and Sweet Pepper

A quick and tasty meal, good for using up bits and bobs from the fridge.  All the quantities are approximate really and a tin of tomatoes could be used instead of fresh, avoiding the need for passata.  


Ingredients
1 Red Pepper, skinned (I normally just do this in pieces under the grill)
2-3 Tomatoes, skinned (you don't have to skin them, I like to)
2 cloves of Garlic
100g Taleggio, rind removed and cut into cubes (or any other soft rinded cheese)
100ml Cream
75ml Passata
A good glug of Olive Oil
Penne Pasta
Salt and Pepper
Pinch of Sugar
  • Put the chopped up tomatoes, pepper and garlic in a frying pan with a good glug of olive oil and sizzle slowly until the tomatoes are collapsing.
  • Add the passata and the pinch of sugar, bring back to the boil then add the cream, stir until bubbling, taste and add seasoning if needed, then turn off the heat.  Add the cubes of cheese, stir lightly then leave.
  • Boil the penne until cooked, drain then toss in the sauce until each piece of pasta is coated.  Serve straight away.

Wednesday

Spelt and Rye Crusty Dipping Bread

It's great when you throw a few ingredients together and it works, that's what happened here.  I wanted to make a small rustic loaf to have with baked camembert as a starter.  I had a small quantity of spelt flour and some wholegrain rye flour so thought I would do a mixture of the two.  
The shape is inspired by the French fougasse bread which is made in the shape of a leaf with slits in it...I haven't been quite that creative but I think the idea of increasing the surface area to create more crusty edges is great for a dipping bread. The texture is quite chewy with big air holes and it's full of flavour, I have found that I make this again and again!


Ingredients
150g White Spelt Flour (plus more for dusting)
150g Wholegrain Rye Flour
1 teaspoon Salt
200ml Warm Water
1 tablespoon Olive Oil
1 teaspoon Sugar
7g (1 sachet) Dried Fast Action Yeast

  • Mix the flours and salt in a large bowl.
  • In a measuring jug, measure the water then add the sugar, yeast and oil, mix.
  • Pour the water mixture into the flour bowl and mix with a fork until a dough is formed.
  • Tip it out onto a floured surface.  If the dough is too wet to handle, dust with more spelt flour (or strong white flour) and work in until it is reasonably easy to handle, it will still be a bit sticky.
  • Knead until bouncy, about 10 minutes should do, then put the dough back into the bowl which you have oiled.  Cover with cling film and put somewhere warmish for 1-2 hours until the dough has doubled in size.
  • Tip the dough back onto the surface and knock the air out, then knead for a few minutes, flatten and shape into an oval.  Put it onto an oiled baking tray and with a sharp knife, cut slits all the way through depth of the dough, keeping it attached at the sides.  Pull the strips apart to create space between them.
  • Recover the dough and leave for 45mins - 1 hour to rise again.
  • Pre-heat the oven to 220C (fan) and bake the bread for 20-25 minutes until dark golden brown and hollow sounding when tapped underneath.
  • Leave to cool, but not totally....it's fabulous warm!  

Tuesday

Raspberry Cheesecake Sandwich Biscuits

These were supposed to be heart shaped....but guess what I can't find the night before Valentine's Day?  My heart shaped cookie cutter naturally!  Of course, for the rest of the year it will be leaping out of the cupboard at me every time I open it....

Anyway, here are my Raspberry Cheesecake Sandwich Biscuits, which certainly aren't to be limited only to Valentine's Day!  They make a fabulous dessert or an afternoon tea treat.  Normally I prefer to be seasonal but wanted a red berry for this and raspberries are my favourite.  As I'm only using them to make a coulis, I'm very happy to use frozen raspberries for this.
Ingredients
50g Caster Sugar
100g Butter
150g Plain Flour
5 Digestive Biscuits, crushed
approx. 4 tbsp Double Cream

250g Raspberries (I use frozen- thawed)
60g Caster Sugar
200g Cream Cheese
175ml Double Cream
approx. 4 tbsp Icing Sugar (more if you want it sweeter)
More icing sugar for icing if wanted
  • To make the biscuits, preheat the oven to 175C (fan).  Cream the butter and 50g of caster sugar together then add the flour, digestive biscuits crumbs and enough double cream to bring it all together into a firm (but not crumbly) dough.
  • Shape the dough into a ball, wrap in cling film and chill in the fridge for 20-30 minutes.
  • Lightly flour your surface and your rolling pin then roll the dough out until 5-10mm thick (keep moving the dough and lightly flouring the surface after each roll to stop it sticking)
  • Using a cookie/pastry cutter (or a round glass or cup if you don't have one), dip the edge in flour then cut as many biscuits as you can out of the dough, reforming into a ball and re-rolling when needed.
  • Put the rounds (or hearts, humph!) onto a lined baking sheet (my circular cutter is 7cm in diameter and I got 16 biscuits - so 8 when finished)
  • Bake in the preheated oven for approx. 10 minutes until golden brown at the edges and firm in the middle.
  • Transfer them to a plate or rack and leave to cool completely.
  • To make the raspberry coulis, put all the raspberries in a small pan and add the 60g of caster sugar.  If you're using frozen there will be enough liquid as they go quite mushy when thawed, if using fresh raspberries you may need to add a tablespoon or two of water to encourage the raspberries to get juicy!  On a medium heat, gradually warm the mixture, stirring to dissolve the sugar, until it starts to boil, then take off the heat.
  • Sieve the raspberry mixture into a bowl, you will need to press and wiggle with a metal spoon to get as much pulp as possible.  Get rid of the seeds then sieve it again to get out any determined seeds that have got through the first time.  Put the coulis aside to cool completely.
  • Mix the cream cheese with the icing sugar until creamy.  Whisk the double cream until forming soft peaks then fold into the cream cheese.  Get your cooled raspberry coulis and tablespoon by tablespoon lightly fold it into the creamy mixture, you should need about 7-8 tablespoons leaving some left over for icing or for making raspberry bellinis...yum!
  • Being generous with it, use the pink, raspberry cheesecake filling to sandwich the biscuits together.
  • If you want to do some icing for the top, use some of the leftover raspberry coulis and add enough icing sugar to make a thick icing.  Then either pipe or just spread onto each sandwich biscuit.
  • These can be eaten straight away but do squidge out at the sides (I know from experience)....probably best to chill in the fridge for a few hours to set the filling a bit and soften the biscuits.


Sunday

Creative Cookies

This is my first of hopefully many 'interactive' blogs.  
I love the thought of a recipe being a flexible idea rather than written in stone and always have.  Some recipes lend themselves to this idea more than others and cookies are a great place to start, especially with children involved!
So the idea for this one is to take my Double Chocolate Cookie recipe and, keeping the basic ingredients the same, open it up to different additions and flavours.  It's a great thing to do for a children's birthday party, although I would weigh out the butter, sugar and flour first and have in bowls.  Also then have available lots of different possible additions, for example; nuts, chocolate chunks (white, milk and dark), dried fruit, orange or lemon zest, peanut butter, coconut...etc.  It's also good to have a few kinds of sugar so they can have the choice with that too!


I had a lovely cookie-making afternoon with three enthusiastic and inspiring girls, Megan, Hannah and Lucy and of course our two little monkeys Jack and Archie...thank you Nadine for giving up her kitchen!  Here are the results....


Megan and Hannah's White Chocolate and Cranberry Cookies


Ingredients

110g Spreadable Butter
100g Caster Sugar
100g Light Muscavado Sugar
175-225g Self-Raising Flour
1 Large Egg
1 tbsp Golden Syrup
1 tspn Vanilla Extract
150g White Chocolate, chopped into big chunks
A few handfuls of dried cranberries

  • Pre-heat the oven to 160C (fan).
  • In a bowl cream the sugar and the butter together with a wooden spoon.
  • Beat in the egg, syrup and vanilla extract.
  • Add the flour and mix in until a stiff dough is formed (start with 175g and add more if needed)
  • You could now add the white chocolate chunks and cranberries as they are but the girls decided to melt half of the white chocolate and keep half in chunks.  They stirred the chocolate chunks and cranberry pieces into the dough then swirled through the melted chocolate.  The cookies did spread a bit in the oven so they decided to add a bit more flour next time.
  • Spoon the dough onto a lined baking sheet and bake for 12-15 minutes until puffed and firming around the edges.


    Lucy's Fruit and Chocolate Cookies


    Ingredients
    110g Spreadable Butter
    100g Light Muscovado Sugar
    100g Caster Sugar
    1 Large Egg
    175-225g Self-Raising Flour
    1 tspn Vanilla Extract
    1 tablespoon Cocoa
    8 Dried Apricots, chopped
    60g Sultanas
    100g Mixture of White and Milk Chocolate Chunks

    • Pre-heat the oven to 160C (fan).
    • Follow the same method as above to make the basic dough.  Then add the cocoa.
    • Mix through the chocolate and dried fruits then spoon the dough onto a lined baking sheet.
    • Bake in the pre-heated oven until puffed and firming around the edges. 


    Jack's Pecan and Chocolate Cookies
    (supervised to prevent too much chocolate disappearing into his mouth)


    Ingredients
    110g Spreadable Butter
    200g Caster Sugar
    1 Large Egg
    175-225g Self-Raising Flour
    1 tspn Vanilla Extract
    2 Handfuls of Pecan Nuts, roughly chopped
    2 Chocolate Flakes, roughly chopped
    A handful of Dark Chocolate Drops

    • Pre-heat the oven to 160C (fan)
    • Follow the same method as above to make the basic dough.
    • Mix through the pecan nuts, chopped flake and chocolate drops.
    • Spoon the dough onto a lined baking sheet and bake for 12-15 minutes until puffed and firming around the edges.

    Thursday

    Crusty Rustic Loaf

    This bread has a crunchy and slightly chewy crust and a soft, holey interior.  It's particularly good with pate, a ploughman's or a mediterranean-style lunch or starter as it's got a savoury, yeasty flavour made more punchy with olive oil.  I've used extra virgin olive oil but it can certainly be made with a lighter oil if you want a milder flavour.
    This loaf does require more yeast than I normally use, which is needed to produce the big air bubbles in this country style loaf.  I normally have the sachets of fast action yeast in my cupboard for making everyday bread and pizza dough but have recently progressed to a little tin of active dried yeast for making breads like this one. 


    Ingredients
    500g Strong White Flour (plus a small amount for dusting)
    2 teaspoons Salt
    300ml Warm Water
    30ml (2 tbsp) Olive Oil
    20g (approx. 2 level tbsp)  Dried Yeast (or 2 sachets of Fast Action Yeast)

    • Put the flour and salt into a large bowl and mix together.
    • Measure the water in a measuring jug then add the oil and the yeast to this and stir, this then needs to be left for 10 minutes to activate the yeast (if using sachets of fast acting yeast it can be used instantly). 
    • Stirring with a fork, add all the water and oil mixture to the flour and stir until a ball of dough is forming.
    • Using your hand, start to knead the dough in the bowl to collect up all the flour and transfer to a lightly floured surface.  Knead for about 5-10 minutes until the dough feels bouncy.
    • Put the dough back into the bowl which you have lightly dusted with flour and leave for 2 hours to rise.  It doesn't really need to be somewhere warm but if it's very cold it may need longer.  It also doesn't really need to be covered.
    • After the dough has doubled in size take it out of the bowl, back on the surface and knead for a few minutes.  Shape into a fat sausage shape and put on to an oil baking tray/sheet and leave to rise again for about an hour.
    • Pre-heat the oven to 210C (fan).
    • When the dough has risen again, make horizontal slashes across the top of the loaf, brush or spray lightly with water and bake in the oven for 30 minutes until dark golden and hollow-sounding when tapped underneath.


    Tuesday

    The Custard Tart Quest

    I love, love, love custard tarts but I'm a bit fussy; pastry too thick, big crunchy bits of nutmeg getting stuck in my teeth or a solid rather than soft, wobbly custard.
    My grandma used to take great pride in her custard tarts and I decided a while ago that I would love to try to recreate the masterpieces that she once made.  Unfortunately, I suspect that her good-with-pastry gene went to my sister, who can whip up a quiche with her eyes closed whereas I break out in a cold sweat at the thought.
    But I am determined...I will not be beaten...I will stay true to my Northern roots, beat my pastry demons and make a custard tart that would make my grandmother proud!

    The traditional method does not require the pastry to be blind baked, but one of my issues is that often the pastry is too thick.  So for my first attempt, to try to avoid this, my pastry was too thin and the custard leaked out.  On my second attempt, I decided to blind bake but the base was too hard and stodgy!

    I'm feeling positive about the third time lucky rule, taking deep breaths and getting myself in a zen-like state, I'm feeling the pastry-love.......


    I think I've cracked it....soft pastry underneath, crisp pastry around the edges, no leakages and tender, wobbly custard.  I've reverted to tradition and not blind baked the pastry, hopefully I've done my grandma proud x

    This is using a 10 inch fluted loose-bottomed flan tin

    Ingredients
    200g Plain Flour
    100g Cold Hard Butter (plus a bit extra for the tin)
    1 heaped tbsp Caster Sugar
    Cold Water as needed
    450ml Whole Milk (you could use cream but milk is more traditional)
    3 large eggs
    4 tbsp Caster Sugar
    Whole Nutmeg for grating


    • Thoroughly butter your flan tin making sure you do up the sides.
    • Put the flour into a bowl and grate in the cold butter (top tip I picked up during internet-based pastry research), this then needs a quick rub with your fingertips but there will still be slivers of butter.  Mix 1 tablespoon of caster sugar into the flour and butter.
    • Tablespoon by tablespoon gradually add the cold water mixing with a fork until it's all coming together in a soft ball of dough.  Wrap the dough in cling film and put in the fridge to rest for about 30 minutes.
    • Pre-heat the oven to 175C (fan).  Unwrap the dough and put on a lightly floured surface, flour the rolling pin and roll the pastry out (moving it around to prevent it sticking to the surface) until it's about 3-4mm thick.
    • Use the pastry to carefully line your flan tin, pushing it into the edges.  If it tears patch it up thoroughly with a spare bit of pastry from the edge.  Leave an overlap to allow for shrinkage, it can be trimmed off when the tart is cooked.
    • In a bowl beat the eggs then dip a pastry brush into this and brush the pastry case to seal.  Add the milk to the bowl of beaten eggs and add the 4 tablespoons of caster sugar.  Mix thoroughly until the sugar is dissolved.
    • Pour the custard mixture into the pastry case (it's easier if you put the pastry in the oven first and pour it in with the oven door open) then grate a sprinkling of nutmeg over the top.
    • Bake the tart for approximately 35 minutes until the custard has a wobble but no liquid remaining.
    • Allow to cool in the tin then carefully remove.  This can be eaten warm or cold. 

    Friday

    Seeded Rustic Loaf

    I make this with all white flour so the bread is soft and fluffy with the lovely crunch of the seeds.  You can use whatever seeds you like, I've used pumpkin and sunflower with the addition of poppy seeds.


    Ingredients
    500g Strong White Flour
    1 heaped tspn Salt
    1 tspn Sugar
    330ml Warm Water
    1 sachet (7g) Fast Action Dried Yeast
    1 tbsp Olive Oil
    Approx. 60g Mixed Seeds (your choice)

    • Mix the salt into the flour in a large bowl.
    • In a measuring jug, measure the water then add the sugar, yeast and olive oil.  Give it a good mix.
    • Make a well in the centre of the flour and pour in the liquid mixing with a fork until it comes together.  Ditch the fork and start to work the dough with your hands to incorporate all the flour.
    • Tip the dough out onto a lightly floured surface and start to knead, it will need about 10 minutes.  It will be quite sticky but keep working it, you can add some more flour if you're struggling but try not to add too much.
    • When you have been kneading it for a good 10 minutes and it's a bouncy, very soft dough, put it back in the flour sprinkled bowl and leave to rise.  I like to give it at least 2 hours, the longer the proving, the better the flavour.  It doesn't really need covering.
    • When you've got a well risen dough, tip it out of the bowl and knead it a bit to knock out the air.  Start to add the seeds, gradually as you knead so they get worked into the dough, remember to reserve some for the top of the loaf.
    • Shape the dough into a round and put it onto a floured baking tray.  Sprinkle on the remainder of the seeds and put it aside to rise again, for about an hour, until doubled in size.
    • Pre-heat the oven to about 220C and bake the bread for approximately 25 minutes or until browned and sounding hollow when tapped underneath.
    • Transfer to a rack to cool completely.

    Thursday

    Broccoli and Blue Cheese Soup

    Brrr....it's a soup day today methinks.  I love making soup for lunch, especially in the winter, I normally make a vat of it then freeze in individual portions.  It's often a generic 'soup' made with whatever veg I have in the fridge, however this morning I bought some broccoli on offer (50p!) so am making this comforting classic.
    I'm using St Agur rather than the traditional Stilton because it's milder and more creamy so the children prefer it....it's also a bit cheaper.  If you really don't like blue cheese you can use mature cheddar maybe with a sprinkling of parmesan.


    Ingredients
    1 head of Broccoli, chopped into chunky pieces
    1 Onion, chopped
    1 medium sized Potato, peeled and cut into small cubes
    1 litre/approx. 2 pints of Chicken Stock (if you want it really rich you could do half stock, half full-fat milk)
    Half a pack (approx. 60g) St Agur (or any blue cheese)
    1 tbsp Creme Fraiche (or cream)
    Salt and Pepper
    • Sizzle the onion in a little olive oil or butter until softened, then add the potato, broccoli and stock.
    • Bring to the boil and simmer for about half an hour until the potato cubes are soft and the broccoli is falling apart.
    • Take off the heat and liquidise (I have a hand/stick blender - a god send for soup making!) until smoothish.
    • Add the creme fraiche and the crumble in the cheese then stir until melted.  It will need salt and pepper so add to your taste.
    • Ladle into a bowl and add a swirl of cream if you want to be a bit fancy.....enjoy!