Saturday

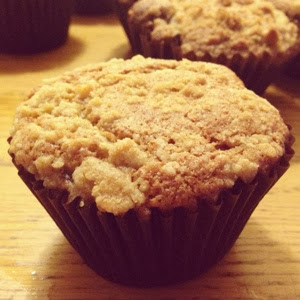
Spiced Clementine and Cranberry Muffins

These beauties will be perfect for breakfast or brunch over the festive period, all the flavours of Christmas in a tidy little muffin with a crunchy crumble top.
These are best eaten the day they are made so, if I am making them for breakfast, I like to measure all the dry ingredients, prepare the cranberries and get the yogurt and egg in a jug in the fridge the night before so it is all ready to be mixed and baked when I get up.

Makes 12 Cupcake Sized Muffins
 
Ingredients
75g Dried Cranberries (sweetened)
Zest and Juice of 2 Clementines
50g Light Muscovado Sugar
100g Caster Sugar
200g Self-Raising Flour
1 teaspoon Bicarbonate of Soda
1 teaspoon Cinnamon
1 teaspoon Ground Ginger
100ml Natural Yogurt
1 Large Egg
150g Butter, melted
For the crunchy topping
25g Light Muscovado Sugar
25g Plain Flour
25g Soft Butter
  • Preheat the oven to 175C (fan).
  • Tip the cranberries into a small pan with the juice of two clementines (having removed the zest from them before cutting in half and squeezing).
  • Put them on a gentle heat until just boiling then turn the heat off and leave them for 15-20 minutes.
  • Measure both the sugars, the self-raising flour, bicarb, cinnamon, ginger and the fine zest of the clementines into a mixing bowl and stir thoroughly to combine.
  • In a measuring jug, mix the natural yogurt with the egg.
  • Make the mixture for the crumbly topping by simply mixing together the sugar, plain flour and soft butter until you have a clumpy crumble.
  • Line your bun tin with cupcake or muffin cases.
  • Take your mixing bowl of dry ingredients and pour in the yogurt mixture, the now cooled and plumped cranberries and the melted butter, then mix quickly but thoroughly with a fork or spatula until it is all combined.
  • Spoon the mixture into the cases (you will notice that it is getting a bit bubbly and puffy) then sprinkle some of the crumble mixture on each one.
  • Bake in the preheated oven for 15 minutes until they are risen and golden brown (if you are unsure you can insert a skewer into one of them to check it comes out clean).

Sunday

Baked Lime and Ginger Nut Cheesecake

Ginger nuts work amazingly well in this cheesecake, making a buttery and very crunchy base for the zingy, lime cream cheese filling.  It also goes without saying that the combination of ginger and lime is a classic one, it just so happens to be particularly heavenly in cheesecake form! 

It is better to make this the evening before you want to serve it, as it needs to cool down slowly in the oven, ideally overnight, then chilled.

I have topped it here with sugared, chopped pecans (see below) and a mixture of whipped double cream, soured cream and icing sugar.  These are fantastic additions but feel free to leave it undecorated, to be enjoyed in its pure cheesecake form.

 
Ingredients
200g Ginger Nut Biscuits
100g Butter, melted
400g Full Fat Cream Cheese
the zest and juice of 1 Large Lime or 2 small Limes
175g Caster Sugar
200ml Soured Cream
3 Large Eggs
 
  • Blitz or bash the ginger nut biscuits to a fine crumb then stir in the melted butter and mix thoroughly.  Press these buttery crumbs evenly into a spring-form tin (approx. 22cm diameter) and chill until needed.
  • Preheat the oven to 150C (fan).
  • Whisk the cream cheese, lime zest, juice and caster sugar until creamy.  Then slowly whisk in the soured cream and eggs until completely combined and smooth.
  • Pour the cream cheese mixture onto the ginger nut base and smooth over the surface. 
  • Bake it in the preheated oven for 45 minutes, then turn the oven off, leaving the cheesecake inside (it will still have a bit of a wobble at this point).  If possible, leave it in the oven until it is completely cold, preferably overnight.  Then remove the cheesecake from the oven and chill in the fridge for at least two hours before removing it from the tin.
  • Decorate the top if you wish or leave it as it is and serve with a dollop of cream.
 
Note: I prepare the pecans for the top by roughly chopping them then sizzling them for a few minutes in a frying pan with a knob of butter and a tablespoon or so of caster sugar (light brown sugar is good too).  Allow them to cool completely before using them on the cheesecake.

Saturday

Fluffy Pancakes

Amazing straight from the pan with a generous squeeze of golden syrup.  Even better with a few rashers of crispy bacon...

 
Makes around 14-15 pancakes
Ingredients
100ml Natural Yoghurt
50ml Milk
1 large Egg
25g Butter, melted
125g Plain Flour
1 teaspoon Bicarbonate of Soda
Pinch of Salt
 
  • Mix the yoghurt together with the milk and egg.
  • Gradually tip in the flour, whisking constantly (I use a balloon whisk) to prevent lumps.
  • Add the bicarbonate of soda, salt then the melted butter and whisk until smooth.
  • Put a dry frying pan on a medium heat for a few minutes to heat up.
  • Spoon dollops of batter into the pan, a heaped tablespoon (approx.) per pancake.  I cook 4 at a time but you may be able to fit more in your frying pan.
  • The pancakes will be ready to flip over after a few minutes when bubbles begin to burst on the surface.  They will need to be cooked on the other side for a further minute until deep golden brown on both sides and puffy.
  • Serve as soon as possible!

Sticky Toffee Pudding Cupcakes

Beautiful, rich yet completely moreish little cupcakes of pleasure.  They are such a treat, particularly when served with a dollop of softly whipped cream...


Makes 12 Large Cupcakes or 18 Smaller Fairy Cakes
Ingredients
100g Soft Butter (spreadable is fine)
175g Light Muscovado Sugar
1 teaspoon Vanilla Extract
 1 Large Egg
225g Plain Flour
1 teaspoon Baking Powder
175g Dates, finely chopped
1 teaspoon Bicarbonate of Soda
200ml Boiling Water
For the Toffee Topping
150g Light Muscovado Sugar
100g Butter
50ml Double Cream
 
  • Preheat the oven to 200C (fan) and put paper cases into a bun/cupcake tin.
  • Cream the butter and sugar together with the vanilla extract until fluffy then slowly whisk in the egg and half of the flour with the baking powder.
  • In a separate small bowl, sprinkle the bicarbonate of soda over the finely chopped dates then pour over the boiling water.  Mix thoroughly to combine.
  • Whisking slowly, carefully pour the dates and hot water into the cake mixture and add the rest of the flour, whisk until combined.
  • Spoon the mixture carefully (it is quite runny) into the cake cases then bake in the preheated oven for 20-25 minutes until well risen, puffy and firm to the touch.
  • While the cakes are cooling make the toffee sauce topping.  Put the sugar, butter and cream into a small pan and heat gently, stirring as it melts.  When it starts to bubble turn it down and let it simmer for about 3 minutes, stirring to make sure it doesn't burn on the bottom of the pan.  After this time all the sugar should have dissolved and you will have a golden brown sauce, set this aside to cool and thicken.
  • After about half an hour the sauce should be thick enough to spoon onto the cupcakes but not run straight off, leave it for longer if it's still too runny.  There should be ample sauce to generously cover all the cupcakes whilst leaving a little extra for the cook to try (just to check it's ok of course).


Sunday

Hot and Fragrant Chicken Curry

This wonderfully tasty and versatile curry is a midweek staple in my house.  It really is very easy and can be tweaked to suit your mood; hot and spicy, mild and creamy, sweet and nutty...whatever you feel like.

I do not apologise for using curry powder, I don't have the time nor the inclination during a busy week to start dry roasting and grinding whole spices.  I believe that if you find a good quality curry powder that you like then boost the aromatic spices with a touch of garam masala, you're onto a winner.  I use Bolst's Mild Curry Powder that I buy from my local specialist food shop (The Wild Food Company in Malmesbury), it's got very rounded spices and I like to control the heat myself.  For the heat I usually use generic red chillies, they are not normally particularly hot so I will use one for the flavour then up the heat with dried chilli flakes if I want to.  If I'm feeling like a hot, hot, hot curry I use scotch bonnet chilli peppers...these are seriously hot though, so beware!

I always remove the skin from the red pepper by putting pieces of pepper under the grill until the skin blisters and blackens.  It is not essential to do this but I feel it concentrates the sweetness and makes a smoother sauce.
This is great made with either breast or thigh meat.

 
Ingredients
500g Chicken Breast or Boneless, Skinless Thigh, cut into chunky pieces
1 Large Red Onion
1 inch cube Fresh Ginger
3-4 Garlic Cloves
1 Fresh Chilli, to taste (see notes above)
1 Red Pepper (with the skin removed by blackening it under the grill)
Sunflower Oil
2 teaspoons Curry Powder
1 teaspoons Garam Masala
Salt and Black Pepper
Water or Stock
Lemon Juice to taste
Sugar to taste
Fresh Coriander

Optional Additions : Cream, Coconut Cream, Ground Almonds, Tomatoes
 
  • Start by making a paste with the onion, ginger, garlic, fresh chilli and red pepper.  I do this in my mini-chopper but you can use a blender (using a glug of sunflower oil to help it along) or just chop it all together as finely as possible on a board.
  • Heat a couple of tablespoons of oil in a large frying pan or wok then add the onion paste with a generous seasoning of salt and black pepper.
  • Cook for a couple of minutes, stirring it around on a high heat then add the curry powder and garam masala.  This now needs to be cooked for another few minutes until the spice aroma is rising from the pan and the oil is separating slightly.
  • Tip in the chunks of chicken and stir them around to coat with the spicy paste.  Do this until the meat is sealed then pour in enough water or stock to cover the meat (you can use coconut milk instead at this point if you like).
  • This now needs to be cooked for 15-20 minutes until the liquid is reduced and the chicken is cooked.
  • At this point you can tailor it to how you like it, possibly by adding a few tablespoons of double cream or coconut cream, maybe sprinkling in a handful of ground almonds to thicken and enrich the sauce.  At the very least you will need to taste your curry and adjust the seasoning as needed, I always add a few squeezes of lemon juice, a sprinkling of sugar to balance and possibly a touch more salt.
  • Finish with a stir-through of fresh coriander (if liked) and serve.


Tuesday

Sweet Coconut Flatbread

These delicious flatbreads make an excellent accompaniment to a curry and are very easy to make.
I normally use semi-skimmed milk to bind the dough together, however I use coconut milk instead if I'm opening a tin to use in something else.
They can be made a few hours in advance then warmed up, wrapped in foil in the oven for 5-10 minutes.

                                     
 Makes about 10 flatbreads
Ingredients
200g Plain Flour
2 teaspoons Baking Powder
50g Butter
50g Desiccated Coconut
Pinch of Salt
50g Caster Sugar
Approx. 6 tablespoons Milk or Coconut Milk 
  • Tip the plain flour into a large bowl with the baking powder.  Cut the butter into small pieces, add it to the flour then, using the tips of your fingers, rub it into the flour until it is all in little lumps.
  • Add the coconut, salt and sugar and mix thoroughly to evenly distribute. 
  • Add the milk or coconut milk a couple of tablespoons at a time, mixing vigorously until it comes together in a firm dough.  Wrap the ball of dough in cling film and chill in the fridge for at least 30 minutes.
  • When you are ready to make the flatbreads break off a golf ball sized piece of dough and roll it between your hands into a ball. 
  • Generously flour your work surface and rolling pin then roll out the ball of dough, flipping it over and moving it after every roll to keep it from sticking.  Roll it out until it is a couple of millimetres thick if you can.  Set aside.
  • Repeat this with the rest of the dough, stacking the rolled out discs between pieces of greaseproof/baking paper or sprinklings of flour.
  • Put a griddle pan or frying pan onto a high heat then dry cook the flatbreads for 1-2 minutes each side until cooked through and patchy golden brown.
  • Stack and eat immediately or allow to cool then wrap in foil to heat later.
 

Thursday

Beef Rendang

This beautiful Indonesian dish is a slow-cooked stew of beef with coconut and spices, which reduces down over hours of cooking so the meat is meltingly tender coated with a rich, aromatic sauce. 
There are lots of recipes for rendang, each differing slightly.  The constants are lemongrass, ginger, coconut, tamarind (or another sour element like lime juice) and sugar.  This is how I like to make it, relying more on the fresh 'spices' rather than going in heavy with cinnamon sticks, cumin seeds and cardamom pods.  It is best made the day before it is to be eaten.
I love to serve this quite simply with fragrant jasmine rice and maybe a steamed green veg.


Serves 2-3
Ingredients
500g Chuck Steak (or any braising beef), cut into chunky pieces
1 Red Onion, roughly chopped
4 large cloves of Garlic, roughly chopped
2 Red Chillies, roughly chopped
2 thumb sized pieces of Ginger, grated (should be about 2 tablespoons)
1 stalk of Lemongrass, finely sliced
2 tablespoons Sunflower Oil
1 teaspoon Ground Coriander
Half a teaspoon Turmeric
Half a teaspoon Cinnamon
400ml Tin of Coconut Milk
4 Kaffir Lime Leaves
3 teaspoons of Tamarind Paste (or more lime juice if you can't get it)
Juice of half a Lime
Sea Salt
1 teaspoon Sugar (palm sugar if you have it but don't buy it especially)
25g Desiccated Coconut
  • Put the chopped onion, garlic, chillies, ginger and lemongrass into a blender or mini-chopper and whizz until very finely chopped.  You can do this on a board with a sharp knife if you don't have a blender.
  • Pour the oil into a large saucepan and put on a medium heat.  Tip the onion paste into the oil and cook for a few minutes then add the coriander, turmeric, cinnamon and a generous seasoning of salt.  Continue to cook for another 5ish minutes until it is turning golden brown and aromatic then add the beef.
  • Stir the beef to coat it in all the spicy onion mixture and seal it.  Pour in the coconut milk then add the kaffir lime leaves, tamarind paste and sugar.  Bring to the boil then turn down to the slowest simmer.
  • This now needs to be simmered slowly for 2-3 hours, stirring occasionally to make sure there is nothing sticking to the bottom of the pan.  If you prefer you can cook this in the oven on a low heat.
  • The result you want to achieve with a rendang is to reduce the majority of the liquid until there is hardly any sauce left.  However, I like to do this in a couple of stages; when the sauce has reduced greatly and the oil begins to come out, turn the heat off and leave to cool for 20 to 30 minutes.  You should then be able to pour off most of the excess oil.  At this point it's good to taste the sauce, add the lime juice if needed and salt or sugar to balance.  You can now continue to cook the rendang or it can be chilled until you are ready to serve it.
  • In a dry frying pan toast the desiccated coconut until golden brown (be careful because it burns easily) then give it a blitz in a blender. 
  • When you are ready to serve the rendang put it on a low heat and, when it starts to bubble stir in the toasted coconut.  Simmer for 5-10 minutes until piping hot and serve.  

Coconut and Cherry Tart

If you like crisp pastry filled with juicy cherries and gooey yet toasty coconut, then this is the tart for you...

 
Ingredients
For the Pastry
200g Plain Flour
100g Hard Butter
25g Caster Sugar
Cold Water
 For the Cherries
250g Cherries
50g Caster Sugar
1 tablespoon Corn Flour
For the Coconut Filling
150g Caster Sugar
150g Soft Butter (spreadable is fine)
2 Large Eggs
100g Desiccated Coconut
  • To make the pastry case, thoroughly butter a tart tin (approx. 25cm diameter).
  • Tip the flour into a bowl then grate in the hard butter, cut through it with a knife to disperse the butter.  When it is crumbly and the butter is evenly distributed tip in the sugar then lightly mix.
  • Pour in cold water, a bit at a time while stirring with a table knife until it comes together into a ball of dough.  Wrap the ball of dough in cling film or greaseproof paper then pop it into the fridge to firm up for about 20 minutes.  Preheat the oven to 200C.
  • Roll out the pastry on a floured surface (flour the top of the dough as well), move the pastry after each roll to prevent it from sticking.  Roll as thin as you can, around 2mm thick is perfect, then carefully transfer to the tin (rolling it onto the rolling pin to lift it works well).  Gently coax the pastry into the tin, pushing it into the corners.
  • Leave any overhanging pastry as it is (unless there's loads, then trim it a bit).  Line the inside with greaseproof or baking paper then fill this with ceramic baking beans or any dried lentil, pea or bean.  Blind bake the case in the preheated oven for 10 minutes.  After this time remove the paper and beans then put the pastry case back in the oven for a further 10 minutes.
  • It should now be golden brown, trim the edges and set aside until needed.  Reduce the temperature of the oven to 150C.
  • While the pastry is baking make the cherry layer.  Cut each cherry in half to remove the stone and pop the fruit into a small pan with the sugar and the corn flour.  Heat it slowly, stirring to coat all the fruit with corn flour (doing this prevents lumps of corn flour).  When it comes to the boil let it bubble for a few minutes then add a tablespoon or two of water, turn the heat to the lowest then cook for about 5 minutes.  Set aside until needed.
  • To make the coconut filling, whisk the sugar and the butter together until pale and fluffy then whisk in the eggs.  Tip in the coconut and whisk slowly to combine.
  • Take your pastry case and tip in the gooey cherries, spread them out so they are evenly spaced across the base.  Spoon the coconut mixture over the cherries and smooth it out to the edges, covering the cherries.
  • Bake the tart in the preheated oven for 40-50 minutes until it is golden brown and has lost most of it's wobble from the centre, it will still give a little if you gently poke the middle.
  • Let the tart cool completely before cutting, it is better served cold.  It will last a few days stored in an airtight container.
 

Saturday

'Secret Ingredient' Chocolate Cake

This is a very, very surprising cake, in the best possible way!  A rather unpromising-looking batter goes into the oven and a dark, moist, utterly delicious chocolate cake comes out. 

It is very easy to make, so great for baking with children.  And I promise you don't taste the courgette, it just helps to create the wonderful moist texture of the cake.

 
Ingredients
175g Plain Flour
50g Cocoa
200g Caster Sugar, plus extra for sprinking
2 teaspoons Bicarbonate of Soda
pinch of salt
200g (ish) Courgette, topped and tailed
100ml Sunflower or Vegetable Oil
100ml Natural Yoghurt
1 Large Egg
1 teaspoon Vanilla
 
  • Preheat the oven to 175C and fully line a loaf tin with greaseproof/baking paper.
  • Sieve the dry ingredients into a large bowl.
  • In a measuring jug measure the oil and the yoghurt then add the egg and vanilla extract and mix.
  • Grate the courgette, as finely as you can, into a bowl.  Pour in the yoghurt mixture and stir to combine (warning - it does not look appetising at this point!).
  • Tip the courgette mixture into the dry ingredients and fold through with a large spoon or spatula until thoroughly mixed together.
  • Spoon or pour the batter into the prepared tin then sprinkle the top with 4-5 teaspoons of caster sugar.
  • Bake in the preheated oven for 45-50 minutes until risen and craggy, check that it is cooked in the middle by inserting a skewer, it should come out clean.
  • Leave for 10-15 minutes to cool in the tin then transfer to a cooling rack or plate to cool completely.

Thursday

Pork Satay

I like to make satay as bite-sized morsels and normally use pork loin steaks for this, with the fat cut off and sliced into thin strips then threaded onto cocktail sticks.  The tenderloin works well too, you can cut it into bigger chunks and skewer them kebab-style.
I first tried cooking the satay meat in the oven years ago when I made masses of them for a party that I was catering for and found that it worked really well.  I always use this method for nibble-sized satay but if I'm making kebabs with bigger pieces of meat I'll cook them on the barbeque or griddle pan.
This recipe can easily be replaced with chicken or (raw) prawns.  The sauce is particularly easy and so very delicious, you'll find yourself dipping lots of foods into it in addition to the satay meat just as vessels to eat more!  I must recommend dipping cucumber into it, so good!

 
 This weight of pork loin steak makes about 16 bite-sized skewers
Ingredients
For the Marinade
350-400g Pork
 3 tablespoons Dark Soy Sauce
Juice of 1 Lime
2 tablespoons Sunflower Oil
1 large (or 2 small) Garlic Clove, minced
2 tablespoons Light Brown Sugar
3 Spring Onions, finely sliced
For the Satay Sauce
4 tablespoons Peanut Butter (I like crunchy but you can use smooth if you prefer)
4 tablespoons Coconut Milk
1 tablespoon Dark Soy Sauce
Juice of half a Lime
2 cloves of Garlic, minced
1 Red Chilli, finely chopped (less or more depending on how hot you want it
  • Cut any fat off the pork and slice into thin strips, put into a bowl.
  • Mix all the ingredients for the marinade together then pour into the meat, give it a good stir to coat.  Cover and refrigerate for at least an hour until needed.
  • To make the sauce simply put all the ingredients into a small pan and slowly heat until combined and glossy, you may need to add some water or more coconut milk if it seems too thick, try not to boil as it may start to separate.  You can make this ahead of time, you will probably need to add some water when you reheat it though.
  • When you are ready to cook preheat the oven to 210C.
  • To cook the pork, take each piece out of the marinade and space evenly onto a large baking tray or roasting tin.  Put in the preheated oven for 10-12 minutes.
  • After this time check one to make sure they are done.  Serve with the sauce on the side sprinkled with some finely sliced spring onion.
  • Watch them disappear within minutes!

Wednesday

Lemon, Rosemary and Garlic Chicken

So it is spring at last!  As Brits we instinctively feel the need to get the barbeque out as soon as the warm sun appears...and why not?  We are accustomed to such changeable conditions that have learnt to act quickly when the sun shines, discarding our boots for flip-flops and glugging down Pimm's with abandonment because, let's face it, we never know how long it's going to last...
So I'm all for celebrating each sunny day enthusiastically and barbequing as often as is feasibly possible!
This is a very simple, Italian-inspired marinade which is full of Mediterranean flavours and makes for very tasty, juicy chicken.  Try to get ready-boned chicken thighs for this, it's a long, messy job to do it yourself.  You can use chicken breasts if you prefer, but you will need to flatten them out a bit by bashing them between two pieces of cling film with a rolling pin before marinating. 
As we always need a Plan B, this is also great griddled or fried on the hob if the weather is not barbeque friendly.

 
Ingredients
4-5 Chicken Thigh Fillets
3-4 sprigs of Fresh Rosemary
3 cloves Garlic, sliced
4 tablespoons Olive Oil
1 Lemon
Sea Salt
Black Pepper
  • Put the rosemary sprigs into a bowl with the sliced garlic, sea salt and pepper, bash them with the blunt end of a knife a few times to release the flavours, or use a pestle and mortar.  
  • Cut the lemon in half and squeeze the juice into the bowl with the rosemary, tear the lemon halves in half and pop them in too.  Pour in the olive oil and give it all a good stir.
  • Trim the chicken thighs by opening them out and cutting off any fatty bits then put them into the marinade.  Squish the chicken around to get it thoroughly covered in all the lemony juices. Leave to marinate for at least an hour in the fridge until ready to cook.
  • To cook the chicken thighs, take them out of the marinade and place, as flat as you can, onto a hot barbeque, griddle pan or frying pan, cook for approx. 5-7 minutes each side until cooked all the way through.  If you are using flattened chicken breast it will probably not need as long.
  • Serve immediately with salad, in a pitta or just eat with your fingers, yum!!


Tuesday

Coconut and Lime Cake

Coconut and lime are a classic combination and work so well in this beautifully light, moist cake.
I make this two different ways depending on how I feel, sometimes with a syrup poured over the warm cake so it soaks in, other times (like in the picture below) I make a runny icing and trickle this over the warm cake to form a glaze.

 
Ingredients
150g Soft Butter (spreadable is fine)
175g Caster Sugar
Fine Zest of 1 Lime
2 Large Eggs
3 heaped tablespoons Natural Yoghurt
175g Self-Raising Flour
50g Desiccated Coconut
For the Syrup
Juice of 1 Lime
50g Caster Sugar plus more for sprinkling
Or for Icing Glaze
Juice of 1 Lime
50-100g of Icing Sugar (depending how thick you want it)
  • Preheat the oven to 175C (fan) and line a loaf tin with greaseproof paper.
  • Whisk the butter, caster sugar and lime zest together until pale and fluffy.
  • Slowly whisk in the eggs and natural yoghurt then gradually add the flour and coconut.
  • Spoon the mixture into the lined tin and bake in the preheated oven for 45-50 minutes until a skewer comes out clean when inserted into the middle.
  • Let it cool for 5 minutes in the tin.
  • For the syrup put the lime juice and the caster sugar into a small pan, heat for a very short time whilst swirling the pan until the sugar is mostly dissolved.  Pour the syrup over the cake while it is still in the tin, sprinkle with some extra caster sugar then let it cool completely.
  • For the icing take the cake out of the tin and put it onto a plate.  Mix the lime juice with the icing sugar to the thickness you want (I like it runny enough to slightly soak in leaving a glaze on the top but you can make it thicker if you like more icing).  Trickle the icing over the top of the cake so that it runs randomly down the sides then leave to set.


Saturday

Rhubarb and Custard Shortbread Tart

This is a beautiful tart, making the most of seasonal British rhubarb by combining it with rich vanilla custard and a shortbread base.  The three elements of the tart can be made in advance (in fact the colour of the rhubarb is more vivid the day after it has been cooked) then put together a few hours before serving.


Ingredients
For the Rhubarb
Approx. 400g Rhubarb
150g Caster Sugar
For the Base
50g Caster Sugar
100g Soft Butter
150g Plain Flour
1 teaspoon Vanilla Extract
For the Custard
300ml Double Cream
50ml Milk
50g Caster Sugar
3 Large Egg Yolks
1 tablespoon Corn Flour
seeds from 1 Vanilla Pod or
1 teaspoon Vanilla Extract

·     To cook the rhubarb, preheat the oven to 175⁰C.  Cut the rhubarb into short pieces and rinse in a colander.  Tip it into a large oven-proof dish with the caster sugar and spread it all out so  it is in a single layer.  Put into the preheated oven for 30 minutes until the rhubarb is soft and tender but still holding its shape whilst surrounded by a pink syrup.  Transfer the rhubarb and syrup into a bowl to cool then cover and refrigerate until needed.
·     To make the base, increase the oven temperature to 200⁰C and thoroughly butter a loose-bottomed tart/flan tin (approx. 25cm diameter).  Beat the butter, caster sugar and vanilla extract with a wooden spoon until smooth and creamy then work in the flour.  Mix vigorously until all the flour is incorporated and you have a stiff, crumbly dough.
·     Press the dough so it covers the base of the tin then ease it up the sides, keep going until it is as even as possible across the base and the sides.  Bake it for 15 minutes until lightly golden brown, it will feel soft but will crisp up as it cools.  Let it cool completely before removing from the tin.
·     For the custard, whisk all the ingredients together in a small pan.  Over a low heat, stir constantly with a wooden spoon until it is thick and steaming but don't let it boil.  Pour it into a bowl and cover with cling film or greaseproof paper, gently placing it on the surface of the custard to prevent a skin forming.  Chill until needed.
·     Gently take the soft pieces of rhubarb out of the syrup using a slotted spoon or sieve then arrange evenly over the custard.  Incidentally, the syrup is wonderful spooned into a glass and topped with Prosecco for a beautifully pink rhubarb bellini.
·     Serve the tart within a few hours of assembling.

Focaccia...different ways

This is a fantastically rewarding bread to make, it doesn't require strenuous kneading and always works a treat.  It's my current favourite nibble to make when friends are coming over for drinks. 

I always make my focaccia by hand, it's a wet, sticky dough which isn't kneaded so much as squashing and stretching it in the bowl.  It isn't a difficult process, just a bit messy, though I have to say that if you have a mixer with a dough hook attachment, this would be the time to use it.  Just mix it on a slow setting for 10 minutes then let it rise as per the recipe.

Ingredients
300g Strong White Bread Flour
1 teaspoon Salt
200ml Warm Water
1 teaspoon Sugar
2 tablespoons Olive Oil (plus a little more for extra trickling)
1 sachet (7g) Fast Action Yeast 
  • Tip the flour and the salt into a large mixing bowl.
  • Mix the warm water together with the sugar, olive oil and yeast and pour it into the flour bowl.
  • Stir it with a fork until it comes together in a wet dough.  Use one hand to hold the bowl and your other hand to work the dough, squashing and stretching it out for about 10 minutes.
  • Cover it with a tea towel or cling film and leave it for about an hour until it has doubled in size.
  • Preheat the oven to 220C and generously brush a baking tin with olive oil (I use my brownie tin which is 30 x 17cm).
  • Scoop the now risen and airy dough into the oiled tin and, using oiled fingers, push it into the tin.
  • You can now just trickle over some good olive oil and sprinkle with sea salt and it will be delicious.  I usually like to add various toppings, the one in the pic is topped with tomato and garlic compote, rosemary and a touch of balsamic glaze.  I've also made it with feta, red peppers and pine nuts, another one with caramelised onions and fresh thyme...whatever is in the fridge, within limits!  All these toppings need to be pushed and squashed a bit into the dough.
 
  • Leave the prepared dough for 20ish minutes to get bubbly and a bit puffy then bake in the preheated oven for 20-25 minutes until golden brown and risen.  Transfer to a rack to cool slightly.
  • It is fantastic served warm or cold, it can be heated up in a hot oven for 10 minutes if you want to make it ahead of time.
 
Little idea...

  • If you have any left over the following day you could try making these crisp little crostini.  Slice the focaccia thinly and place onto a lightly oiled baking tray in a single layer.  Sprinkle with sea salt and bake them for about 10 minutes at 200C, flipping them over halfway through.  Turn off the oven and leave them in to cool with the oven door slightly open.
  • They will then be crunchy and ready to be dipped or used as a base.

Pecan and Honey Bread

This is a robust, tasty bread which is absolutely perfect with pretty much any cheese.  Quite a claim I know...but really, the crunchy pecans and seeds coupled with a touch of delicate sweetness from the honey make a heavenly marriage with soft, ripe Brie, tangy Stilton or some salty feta.  Cheese aside, this wonderful little loaf is also great with thickly sliced ham and chutney or just toasted and scoffed with lashings of butter!
I like using a ready seeded or mixed grain bread flour for this, my current favourite is one from Wessex Mill.

 
Ingredients
350g Mixed Grain or Mixed Seed Bread Flour
Half a teaspoon Salt
200ml Warm Water
1 tablespoon Sunflower Oil
3 tablespoons Honey
1 sachet (7g) Fast Action Dried Yeast
75g Pecan Nuts, roughly chopped
  • Mix the salt into the flour in a large mixing bowl.
  • In a measuring jug mix 2 tablespoons of the honey with the warm water and oil until the honey is dissolved.  Add the yeast and stir.
  • Pour the liquid into the flour bowl and mix with a fork until a dough forms.  Take the dough out of the bowl and onto a floured surface.
  • Knead the dough by stretching and working it for about 10 minutes, it will be quite sticky and messy but try not to add too much flour.  Knead it until it feels more manageable and stretchy, form it into a ball and put it into a floured bowl.  Leave to rise for at least at hour until the dough has doubled in size.
  • While the dough is proving, toast the nuts in a dry frying pan until lightly toasted.  Tip them into a bowl and, while they are still hot, stir in 1 tablespoon of honey to coat all the nuts.  Set aside to cool until needed.
  • When your dough is fully risen knock it down in the bowl and take it out onto the lightly floured surface again.
  • Flatten the dough out a bit and tip the honeyed pecan nuts onto it.  Fold the dough over the nuts then knead for a few minutes to incorporate the nuts.  You can reserve a few to strew on the top if you like, they can burn a bit though.
  • Shape the dough into a sausage then roll it with your hands to lengthen, you should also be able to pick it up by the ends and swing it slightly to stretch it out.  When your dough 'sausage' is about 45-50cm long transfer it onto a floured baking tray and loop into a circle, squashing the ends together.
  • Set aside to rise again for about 45 minutes.  Preheat the oven to 220C.
  • Once the dough has risen for the second time, bake in the preheated oven for 20 minutes until risen, craggy and deep golden brown.


Wednesday

Creamy Mustard Savoy Cabbage

This is my absolute favourite way to cook any of the softer leaved cabbages, simple and very tasty.  It also works beautifully with the addition of  a minced clove of garlic.


Ingredients
1 Savoy Cabbage, chunkily sliced and washed in a colander
Juice of half a Lemon
1 teaspoon Wholegrain Mustard
2-3 tablespoons Single Cream
Optional: Clove of Garlic, minced
Salt and Black Pepper
  • Squeeze the lemon into a large saucepan and add the mustard, give it a quick stir (if you are using garlic add it to the pan now).
  • Tip the cabbage into the pan, cover with a lid and put on a medium heat.  Let it steam for 5 minutes.
  • Uncover and stir in the cream, cook uncovered for a few more minutes then season and serve.

Tuesday

Spiced Garlic Roasted Potatoes and Peppers

This is a delicious way of roasting potatoes, spicing them up with garlic, smoked paprika and sweet red peppers. 

 
Ingredients
1 kg Potatoes, washed and cut into large cubes (no need to peel)
2-3 Red Peppers, cut into chunky pieces
2 cloves of Garlic, minced
1 teaspoon Smoked Paprika (Pimenton)
Salt and freshly ground Black Pepper
1 Red Chilli, chopped or a pinch of Dried Chilli Flakes, optional
Olive Oil
  • Preheat the oven to 200C.
  • Toss all the ingredients together in a roasting tin with a generous glug of olive oil.
  • Roast in the pre-heated oven for an hour until the potatoes are tender and crisp around the edges, giving them a turn and a shuffle halfway through the cooking time.

Wednesday

Chocolate Muffins

It seems that winter is determined to linger on, so while the snow whirls around outside, some comfort baking is in order methinks.  Although I don't know who I'm trying to kid, it's not as if I stop when the warmer weather comes!
These muffins are fab, really quick and easy to throw together.  I've used white chocolate this time but often use milk or dark chocolate, sometimes fruit too...cherries are particularly good.


Makes 12 large muffins
Ingredients
75ml Milk
125ml Sunflower Oil
2 Large Eggs
1 teaspoon Vanilla Extract
175g Self Raising Flour
50g Cocoa
1/2 teaspoon Bicarbonate of Soda
175g Caster Sugar
150g White Chocolate, roughly chopped
  • Preheat the oven to 200C and fill a muffin tin with paper cases.
  • Mix the milk, oil, eggs and vanilla extract together in a measuring jug.
  • In a mixing bowl, combine all the dry ingredients including the chocolate.
  • Pour the wet ingredients into the dry then lightly mix until just combined.
  • Spoon into the paper cases and bake in the preheated oven for 15-20 minutes until risen with a glossy top.
  • Eat on the day you make them.